Automating ADF's CI/CD with Selective Deployment (Generation 2)
This would be a leap forward from publishing a Full ARM into a Selective Deployment of Components, I'll introduce Azure DevOps Marketplace and show you how to install the extension Deploy Azure Data Factory (#adftools) created by Kamil Nowinski and step-by-step how to configure our ADF.

Introduction
Moving forward in our ADF evolution journey defined in ...

It is now the time for Automating our ADF's CI/CD with Selective Deployment (Generation 2)!
Microsoft's recommend for automated publishing The new CI/CD flow:
[...] build process that uses a DevOps build pipeline [...] responsible for validating Data Factory resources and generating the ARM template instead of the Data Factory UI (Publish button).
We are going to take this very same concept and extend it... literally! We are going to be using an extension Deploy Azure Data Factory (#adftools) created by my colleague Kamil Nowinski.
This extension to Azure DevOps has three tasks and only one goal: deploy Azure Data Factory (v2) seamlessly and reliable at minimum efforts. As opposed to ARM template publishing [...] this task publishes ADF directly from JSON files, who represent all ADF artefacts.
Setting the stage
Let's use the following scenario for educational purposes: Company "TechTF" has a SQL database named "locasqlserver" hosted "on-premises", that is, accessible only from its local network. They want our team to build up a pipeline using Azure Data Factory to read the contents of a table called "dbo.historicaldata" and truncate & load into an Azure Database the last 6 months of data, ADF pipeline needs to be executed first day of each month, this feature has been classified as a data product and given the name "Recent History".
One additional ADF pipeline will extract time-series datasets into an Azure Storage Account Gen2, this pipeline is required to run hourly without interruptions, this will also be classified as a data product and named "TS Ingestion"
The "extraction team" is commissioned to build the ADF pipeline, its members are just you and a colleague with the same permissions and complete authority to configure two Azure Data Factory instances, one for development and another for production.
Both data products are expected to begin development simultaneously, and their release to production should occur as soon as possible, independently of each other sharing the same ADF infrastructure.
The company adheres to modern software development practices, making it imperative to automate the integration of code changes (Continuous Integration) and the delivery of those changes to production (Continuous Deployment). This requirement should be a driving force behind any considerations in architecture design.
The company already have an Azure account as well as an Azure DevOps account (AzDO) up & running with service connections, billing and permission in place, there's a project created to host this and other data products named "RTD" and a Git-repository called "recent-history"
Recommend my series The Anatomy of a Resilient Azure DevOps YAML Pipeline (Series)
In Part 1. Azure Account vs DevOps Account and Part 2. Repository hosting & branching strategy I explain all you need to know to get your environment started.
Procedure
On the next part of the article, I'll explain just the most relevant parts of the code
Deploying the Infrastructure
We are going to create two ADF instances, one that is Git-author enabled for Development, and another one for Production using only Live mode, both were created with BICEP as shown below

I invite you to read my article Infrastructure-as-code made easy with Bicep language with a detailed explanation on the code.

Orchestrate the creation of your infrastructure using our Resilient Azure DevOps YAML Pipeline

Configuring ADF's back-end
- If everything went well with your deployment, navigate to your ADF in Development and create a new feature branch, name this branch something like "feature/yyyymmdd_automate-adf-cicd-full-deployement-g2"

- Crete a temporary pipeline and click Save All, this action will create a new folder in your feature branch (1) from the path defined for rootFolder in BICEP (2)

Create Workspaces in ADF
As described on "Setting the stage"...
[Recent History and TS Ingestion] are expected to begin development simultaneously, and their release to production should occur as soon as possible, independently of each other sharing the same ADF infrastructure.
Each data product will use one filter file and one or more configuration files where...
- Filter file. This file specifies (include or exclude) objects to be deployed by name and/or type and/or type
- Configuration files. This files are use for replacing all properties environment-related, hence, its expected to be one per environment
Using a name convention, each data product creates its own pipelines, datasets, flows & triggers and list them into it's own Filter file, like this ...

From the extension's documentation on Includes & Excludes rules in a file
Because one file contains all rules [...] an extra character should be provided before the name/pattern: (plus) - for objects you want to include to a deployment, (minus) - for objects you want to exclude
This is much more complex example using wildcards!
+pipeline.*
trigger.*
-*.SharedIR*
-*.LS_SqlServer_DEV19_AW2017
-*.*@testFolder
To use a simple example of what should Configuration files contain and why it should be one per environment; let us assume that we want all triggers in development to be Stopped, in particular the one for TS Ingestion that runs hourly as it can be to expensive whereas executing the pipe manually ad-hoc would suffice for development purposes, but in production, we want the pipe to run automatically on scheduled, then our configuration files for TS Ingestion should look like this...

This is much more complex example!

Or how about this other example? You can configure pretty much everything!

From the extension's documentation on Step: Replacing all properties environment-related
Each environment (or stage) has to be exactly the same code except for selected properties [...] All these values are hold among JSON files in the code repository and due to their specifics - they are not parameterised as it happens in ARM template. That's why we need to replace the selected object's parameters into one specified for particular environment.
Installing the extension
I'll show you how to install extension in this video
Configuring AzDO YAML pipeline
I'm assuming at this point that you will be using the same Resilient Azure DevOps YAML Pipeline to create the infrastructure, therefore, I'm not explaining in detail those tasks here.
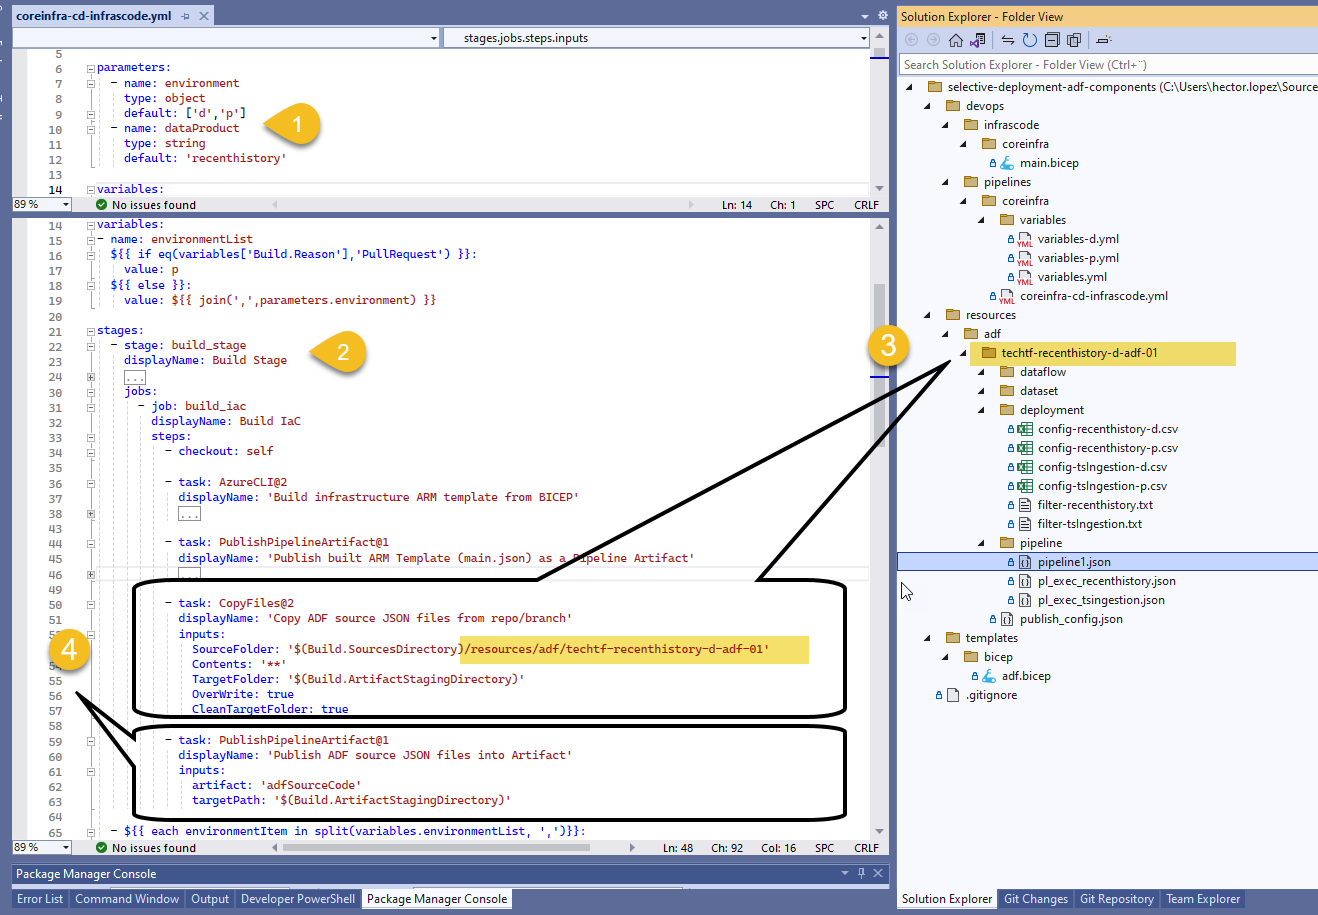
- First to notice is the introduction of an input parameter (1) for the pipeline to deploy components for either of our Data Products; within our build_stage (2) we are going to "copy" the entire content for our ADF (3), as explain previously, is just a bunch of JSON files arranged in folders as shown; last task in the stage creates and publish an artifact (4) for a subsequent stage to download & use.

- Within our postdeployment_stage (1), we first download (2) our published artifact from previous build stage and we configure the Publish ADF Task (3) by providing which Data Product to deploy via input parameters as highlighted and other options that fit our needs; most of the options have comments that explain briefly what they do 😉

From the extension's documentation on Publish Azure Data Factory
- CreateNewInstance. Indicates whether to create a new ADF if target instance doesn't exist yet.
- DeleteNotInSource. Indicates whether the deployment process should remove objects not existing in the source (code)
- StopStartTriggers. Indicates whether to stop the triggers before beginning deployment and start them afterwards
Call for action
Get the code automate-adf-cicd-selective-deployment-g2 and try it out!!! Next article I'll extend on the same concept but with a more advance case scenario where we will divide ADF components into two groups: Core and Data Product 🤔
If you like to get my next article directly via email, below is the subscription button... wish you all the best!


